IT 117: Intermediate Scripting
Class 27
Review
New Material
Final Exam
The final exam will be held on Thursday, December 22nd from 3 to 6 PM.
The exam will be given in this room.
If for some reason you are not able to take the Final at the time it will
be offered, you MUST send an email to me before the exam
so we can make alternative arrangements.
The final will consist of questions like those on the quizzes, along with questions
asking you to write short segments of Python code.
60% of the points on this exam will consist of questions from the Ungraded
Class Quizzes.
The remaining 40% will come from 4 questions that ask you to write
some code.
The last class on Tuesday, December 13th, will be a review session.
You will only be responsible for the material in that review session
and the review for the Midterm, which you will find
here.
There will be no class on what would normally be the last day of class, Tuesday, May 10th.
But I will be in this classroom at the regular time for any student who needs additional help.
This should give you a week to study for the final.
Although the time alloted for the exam is 3 hours, I would
expect that most of you would not need that much time.
The final is a closed book exam.
To prevent cheating, certain
rules
will be enforced during the exam.
Course Evaluation
At the end of each semester we offer you the opportunity
to say what you think about this course.
What have I done right?
What have I done wrong?
What can I do better?
You are not asked for you name.
So the submissions are anonymous.
I will not see your responses until after I have submitted grades
for this course.
We collect this feedback through Course Evaluations.
I will use what you say to make this course better.
To complete the course evalutaion, use the following
link
.
You have until Wednesday, December 21st, to submit the evaluation.
Review
- The programmer does not place widgets in a window
- Tkinter handles this task with things called
layout managers
- The are also called
geometry managers
- The code in these methods positions the widgets to best advantage
- Tkinter provides three layout managers
- Every time you create a widget you must call a layout manager
- If you don't
- The Widget will not appear
The pack Layout Manager
- pack has a side
named argument
- side can have the following values
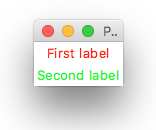
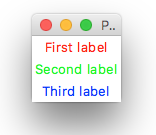
- To align the buttons horizontally, I can write
self.l1 = Label(self.root, text="First label", fg="red")
self.l1.pack(side="left")
self.l2 = Label(self.root, text="Second label", fg="green")
self.l2.pack(side="left")
self.l3 = Label(self.root, text="Third label", fg="blue")
self.l3.pack(side="left")
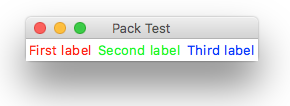
- The window now looks like this
- A Frame is a container that can hold other widgets
- Let's create a window with two frames
class FrameWindow:
def __init__(self):
self.root= Tk()
self.root.title("Frame Test")
self.top_frame = Frame(self.root)
self.bottom_frame = Frame(self.root)
self.top_frame.pack()
self.bottom_frame.pack(
- Note that the parent object for the frames is the root
- We now create labels and attach them to the frames
self.l1 = Label(self.top_frame, text="Red label", fg="red")
self.l1.pack(side="top")
self.l2 = Label(self.top_frame, text="Green label", fg="green")
self.l2.pack(side="top")
self.l3 = Label(self.top_frame, text="Blue label", fg="blue")
self.l3.pack(side="top")
self.l4 = Label(self.bottom_frame, text="Magenta label", fg="magenta")
self.l4.pack(side="left")
self.l5 = Label(self.bottom_frame, text="Cyan label", fg="cyan")
self.l5.pack(side="left")
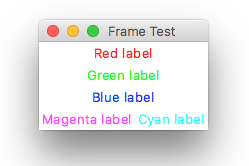
- When we run this, we see
The grid Layout Manager
- grid works like a spreadsheet
- It has cells specified by row and column numbers
- Each widget is placed in one of these cells
- The row and column numbers both start at 0
- Each call to grid needs two values
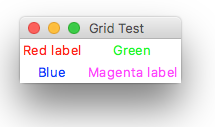
- Here is code with four labels laid out using grid
class GridWindow:
def __init__(self):
self.root= Tk()
self.root.title("Grid Test")
self.l1 = Label(self.root, text="Red", fg="red")
self.l1.grid(row=0, column=0)
self.l2 = Label(self.root, text="Green", fg="green")
self.l2.grid(row=0, column=1)
self.l3 = Label(self.root, text="Blue", fg="blue")
self.l3.grid(row=1, column=0)
self.l4 = Label(self.root, text="Magenta", fg="magenta")
self.l4.grid(row=1, column=1)
mainloop()
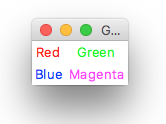
- This is what we see when the code is run
- If I change the width of the label by adding text
- grid makes each column wide enough
to hold the largest value
- A Button object can be connected to an action
- The action happens when the button is clicked
- The Button constructor has the following
named arguments
- text - the button text
- command - the function run
when the button is clicked
- The value of command is usually a function name
- But it can also be an action built in to the root object
- Here is a simple program that creates a window with a single button
- Clicking the button cases the program to quit
from tkinter import *
class ButtonWindow:
def __init__(self):
self.root= Tk()
self.root.title("Button Test")
self.button = Button(self.root, text="Quit", command=quit)
self.button.pack()
mainloop()
root = ButtonWindow()
- quit is a function that causes Tkinter to quit
- When the code is run, a small window appears
- When I click the button the window disappears
The messagebox Module
- Messageboxes are windows use to tell something to the user
- These objects are contained in the tkinter.messagebox
module
- There are a number of different types
- showinfo
- showwarning
- showerror
- askquestion
- askokcancel
- askyesno
- askretrycancel
- The first three functions are similar
- They each display some text in a window
- The user has to click on "OK" button to make them disappear
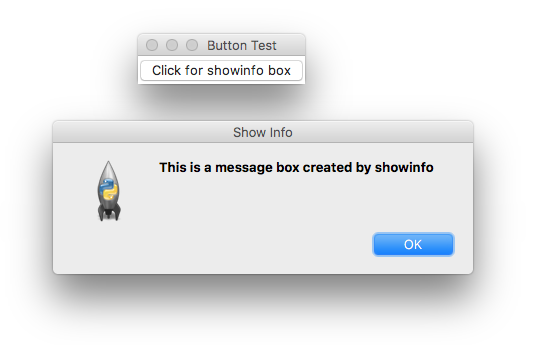
- Here is an example
from tkinter import *
class ButtonWindow:
def __init__(self):
self.root= Tk()
self.root.title("Button Test")
self.button = Button(self.root, text="Click for showinfo box", command=self.action)
self.button.pack()
mainloop()
def action(self):
messagebox.showinfo("Show Info", "This is a message box created by showinfo")
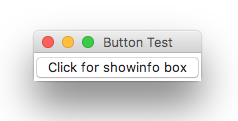
- When run, a small window appears
- When you click on the button, a dialog box appears
- Clicking the "OK" button makes the box go away
New Material
Making Things Happen in a Window
- The function used with a button is called a
callback function
- Another name is an
event handler
- We usually have a button attached to a callback function
- But they can be associated with other widgets
- When a user clicks a button an event is created
- But many other user actions create an event
- Events occur when a user
- Presses a button
- Hits a key
- Moves the mouse
- Resizes a window
- These events are created by the graphic component of the operating system
The Entry Widget
- For most interactions with a user we need something more than a messagebox
- We need something where a user can enter a value
- This is the job of the Entry widget
- This widget creates an rectangular area
- When the user clicks inside this box they get a text insertion point
- That little vertical line that invites you to type something
- Each Entry widget has a
get method
- Which returns the text entered by the user
- A typical program will have multiple Entry widgets
- Along with a button used to submit the data
- The callback function will call the get method
of each Entry widget
Converting Kilometers to Miles
- Let's write a program that convert kilometers into miles
- The conversion formula is
miles = kilometers * 0.6214
- The app will have two frames
- One for the Entry widgets
- And the other for buttons
- Here is the code
self.root= Tk()
self.root.title("Kilometers to Miles")
# top frame
self.top_frame = Frame(self.root)
self.prompt_label = \
Label(self.top_frame, text="Enter a distance in kilometers:')
self.kilo_entry = Entry(self.top_frame, width=10)
self.prompt_label.pack(side="left')
self.kilo_entry.pack(side="left')
self.top_frame.pack()
# bottom frame
self.bottom_frame = Frame(self.root)
self.calc_button = \
Button(self.bottom_frame, text="Convert', command=self.convert)
self.quit_button = Button(self.bottom_frame, text="Quit', command=self.root.destroy)
self.calc_button.pack(side="left')
self.quit_button.pack(side="left')
self.bottom_frame.pack()
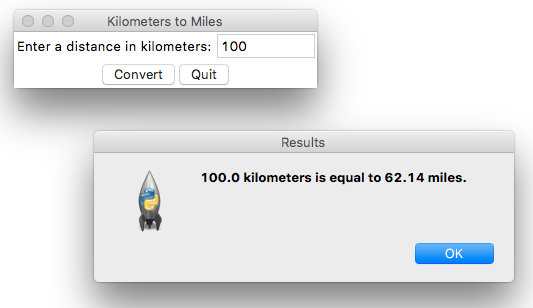
- When you run this script, you get
- The code in blue creates the
Entry widget
- The code in green creates the button
that calls the following
def convert(self):
kilo = round(float(self.kilo_entry.get()), 2)
miles = round(kilo * 0.6214, 2)
messagebox.showinfo('Results', \
str(kilo) + ' kilometers is equal to ' + \
str(miles) + ' miles.')
- This code first gets the the value from the
kilo_entry widget
- But the value is a string so it must be converted into a float
- Now the converted value can be calculated
- And displayed in a showinfo messagebox
- When run, we enter a value for kilometers in the
Entry widget
- Click the Convert button
- An a messagebox appears with the converted value
- You can see the code for this script here.
Using Labels as Output Fields
- A messagebox is not the best way to show the converted value
- A better option would be to show it in the original window
- We don't need a new widget to do this
- We can use a Label widget for this purpose
- You do this using a special type of Tkinter object
- These objects allow you to pass a value to a widget
- There come in four classes
- StringVar
- IntVar
- DoubleVar - holds a
float
value
- BooleanVar
- A StringVar object passes a string value
to a widget
- An IntVar object passes an integer
- And so on
- You have to create one of these objects for each widget that gets a value
- So how do you use such an object with a label?
- A label is used to display text or a graphic
- When we want a label to show a string
- We use the text named argument in the constructor
- Like this
self.label = Label(self.main_window, text="Hello, world!")
- If instead we want the label to show the value of a variable
- We first create an object of one of the classes mentioned above
- Then you use the textvariable
named argument of the constructor
- Like this
self.miles = StringVar()
self.miles_label = Label(self.mid_frame, textvariable=self.miles)
- You use textvariable instead of
text with the Label
constructor
- When we do this, miles_label
will show the value of the value variable
- Let's modify the code above to have a label display the converted value
- This will be done in a new middle frame
# mid frame
self.mid_frame = Frame(self.root)
self.descr_label = Label(self.mid_frame, text="Converted to miles:')
self.miles = StringVar()
self.miles_label = Label(self.mid_frame, textvariable=self.miles)
self.descr_label.pack(side="left')
self.miles_label.pack(side="left')
self.mid_frame.pack()
- Now I have to change convert to give a value
to miles
def convert(self):
kilo = float(self.kilo_entry.get())
miles = round(kilo * 0.6214, 2)
self.miles.set(miles)
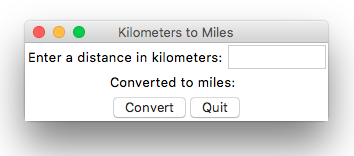
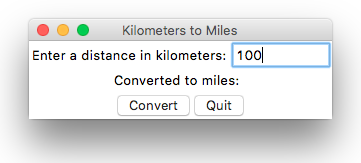
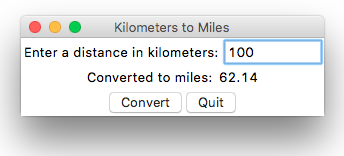
- When run, the following appears
- Now we enter a value in the input field
- Then we click the Convert button
- An Entry object allows the user to enter a value
as a string
- But that value can be anything
- So your program will have to check the value to see that it makes sense
- This is called
data validation
- And it can involve writing quite a bit of code
- But sometimes you only want the user to select a value
- From a list of options
- Radio buttons are a GUI device that presents the user with a list of values
- And allows them to select one
- If you click on one button and then another
- The first button clicked becomes unselected
- So radiobuttons can only return one value
- Tkinter has a RadioButton class
- To use it you have to create one RadioButton object
for each potential value
- You must also create an object of one of the variable classes mentioned above
- StringVar
- IntVar
- DoubleVar
- BooleanVar
- The constructor for a RadioButton has the following
named arguments
- text - The label appearing to the right of the button
- variable - The variable object that will hold the value
- value - The choice assigned to that button
- command - A function that is called when the button is selected
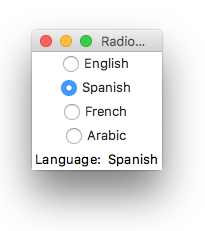
- Let's say a user needed to chose a language from the following choices
- English
- Spanish
- French
- Arabic
- We need to create a RadioButton object for each
language choice
- We create a Frame object to hold all the buttons
self.top_frame = Frame(self.root)
- Then create StringVar object to hold the value
selected
self.language_var = StringVar()
- It is also a good idea to assign a
default value
to this object
- We do this using the object's set method
self.language_var.set('English')
- Now we can create a RadioButton object for each choice
self.rb1 = Radiobutton(self.top_frame, \
text="English', variable=self.language_var, \
value="English', command=self.show_choice)
self.rb2 = Radiobutton(self.top_frame, \
text="Spanish', variable=self.language_var, \
value="Spanish', command=self.show_choice)
self.rb3 = Radiobutton(self.top_frame, \
text="French', variable=self.language_var, \
value="French', command=self.show_choice)
self.rb4 = Radiobutton(self.top_frame, \
text="Arabic', variable=self.language_var, \
value="Arabic', command=self.show_choice)
- Each time a button is clicked, show_choice
is run
- Here is the code for this method
def show_choice(self):
language = self.language_var.get()
self.value.set(language)
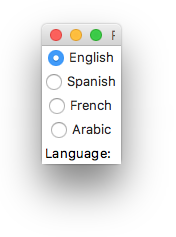
- When we run this script we get
- When you click on a radio button, the selected value appears
- You can view the code here
Check Boxes
- Radio buttons only allow one choice
- To allow the selection of multiple values you need check boxes
- So Tkinter provides a CheckBox class
- Just as with a RadioButton object,
you need a variable object
- A RadioButton object needs only one variable
object
- But CheckBox objects need one for each value
- Another difference is the type of variable object
- A RadioButton object can be associated with any variable type
- A check box can really only have two values
- On or off
- So a BooleanVar object is a better choice
for a CheckBox object
- The CheckBox constructor takes the following
named arguments
A CheckBox Example
- Let's create a script to select services from a small garage
- Oil change
- Inspection
- Tire rotation
- First we create a BooleanVar object for each service
self.cb_var1 = BooleanVar()
self.cb_var2 = BooleanVar()
self.cb_var3 = BooleanVar()
- Then initialize each value to
False
self.cb_var1.set(False)
self.cb_var2.set(False)
self.cb_var3.set(False)
- Now we can create three CheckBox objects
self.cb1 = Checkbutton(self.top_frame, text="Oil change', \
variable=self.cb_var1, command=self.show_choice)
self.cb2 = Checkbutton(self.top_frame, text="Inspection', \
variable=self.cb_var2, command=self.show_choice)
self.cb3 = Checkbutton(self.top_frame, text="Tire rotation', \
variable=self.cb_var3, command=self.show_choice)
- Each of these uses the same callback function
def show_choice(self):
choices = []
if self.cb_var1.get():
choices.append('Oil change')
if self.cb_var2.get():
choices.append('Inspection')
if self.cb_var3.get():
choices.append('Tire rotation')
choice_list = ''
for choice in choices:
choice_list += choice + '\n'
self.value.set(choice_list)
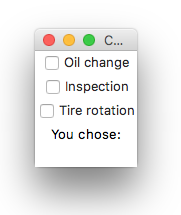
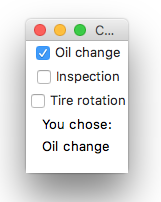
- Here is what I get when I run the script for the first time
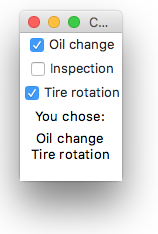
- And here is what happens when I select different buttons
- You will find the code
here
Designing User Interfaces
- When we write command line scripts the user interface is simple
- We get input from the command line
- And then print the results to the screen
- But when you create graphic programs things get more complicated
- Command line programs are usually run by technical people
- Who are not frightened by the command line
- But graphical programs are usually created for a more general audience
- Creating a good user interface design for such a program is not easy
- It's almost more art than science
- You need to know quite a bit about the psychology of perception
- That is why most organizations hire special programmers for the user
interface
- It is easy to create a bad user interface
- And very hard to create a good one
Contract for the Web
Attendance
Class Exercise